什么是 MCP 服务?如何利用 cursor + MCP 快速将现有服务接入大模型?
我举一个非常简单的例子,假设我有一个电商后台系统,除了有一个前端的控制台之外,还有有一套现成的统一的后端 API,那如果现在我想将我的后台系统接入大模型,通过自然语言来进行一些操作,而不是手动在控制台上点来点去,我们只需要简单的写一个 MCP 服务,大概的样子:
ounter(lineounter(lineounter(lineounter(lineounter(lineounter(lineounter(lineounter(lineounter(lineounter(lineounter(lineounter(lineounter(lineounter(lineounter(lineounter(lineounter(lineounter(lineounter(lineounter(lineounter(lineounter(lineounter(line
// 定义 MCP 服务
server.tool('create-user', '用于创建用户', (params) => {
    // 调用后端创建用户的 API
    return axios.post('/api/users', params);
});
server.tool('create-order', '用于创建订单', (params) => {
    // 调用后端创建订单的 API
    return axios.post('/api/orders', params);
});
server.tool('get-order-status', '用于查询订单状态', (orderId) => {
    // 调用后端查询订单状态的 API
    return axios.get(/api/orders/${orderId}/status);
});
server.tool('update-inventory', '用于更新库存', (productId, quantity) => {
    // 调用后端更新库存的 API
    return axios.put(/api/inventory/${productId}, { quantity });
});
实现了这么一个服务后,我们可以将这个服务通过 cursor,cline,claude app 等 AI 客户端进行接入,直接通过自然语言描述自己想要进行的操作,大模型就会解析你的语意以及 MCP 服务中我们自己写的描述,去组合调用不同的 API,例如用户输入请为用户 "john_doe" 创建一个新订单,商品是 2 件商品 ID 为 "123" 的商品,配送地址是 "上海市浦东新区"。大模型解析用户的自然语言输入,提取出以下信息:
用户ID:
john_doe商品:
[{ productId: "123", quantity: 2 }]配送地址: 上海市浦东新区 大模型调用
create-order工具,传入解析后的参数:
ounter(lineounter(lineounter(lineounter(lineounter(lineounter(lineounter(lineounter(lineounter(line
{
    "userId": "john_doe",
    "products": [
        { "productId": "123", "quantity": 2 }
    ],
    "shippingAddress": "上海市浦东新区"
}
MCP 服务将请求转发给后端 API,完成订单创建,并返回结果给用户:
ounter(lineounter(lineounter(line
订单创建成功,订单ID为 "ORDER_123456"。
目前已有许多成熟的 MCP 服务,例如 GitHub 的 MCP 支持创建仓库、提交 PR 等操作;Figma 的 MCP 可以直接生成 UI 设计图;浏览器和操作系统的 MCP 则能增强 cursor 的能力,甚至可以让 cursor 基于浏览器中的错误信息自动调试代码。这些服务极大地扩展了 LLM 的应用场景,使其能够更智能地完成复杂任务。下图是 Cline 中可以直接快速集成的一些 MCP 服务:

具体实现 MCP 服务
具体如何实现一个 MCP 服务上面简单提了一下 MCP 服务的大致实现原理,接下来我们根据官方文档[1]中介绍,从零开始实现一个 MCP 服务。
首先我们需要有一套现有的后端服务 API,可以是我们曾经开发过的小项目,或者是一些开源的带有开放 API 的库,这里我选择了开源的 APISIX[2] 网关,因为它有一套现成的 Admin API[3],并且还有 API 文档,这可以提供给 cursor 作为参考帮助我们快速将所有 API 转换成 MCP 服务中的操作。
设置环境
ounter(lineounter(lineounter(lineounter(lineounter(lineounter(lineounter(lineounter(lineounter(lineounter(lineounter(lineounter(lineounter(lineounter(lineounter(lineounter(line
# 创建一个新的项目目录
mkdir apisix-mcp
cd apisix-mcp
# 初始化一个新的 npm 项目
npm init -y
# 安装依赖
npm install @modelcontextprotocol/sdk zod
npm install -D @types/node typescript
# 创建项目文件
mkdir src
touch src/index.ts
更新
package.json文件,添加
type: "module"和一个构建脚本:
ounter(lineounter(lineounter(lineounter(lineounter(lineounter(lineounter(lineounter(lineounter(lineounter(lineounter(lineounter(lineounter(lineounter(line
{
    "type": "module",
    "bin": {
        "apisix-mcp": "./build/index.js"
    },
    "scripts": {
        "build": "tsc && chmod 755 build/index.js"
    },
    "files": [
        "build"
    ]
}
在项目根目录下创建一个
tsconfig.json文件:
ounter(lineounter(lineounter(lineounter(lineounter(lineounter(lineounter(lineounter(lineounter(lineounter(lineounter(lineounter(lineounter(lineounter(lineounter(lineounter(lineounter(line
{
    "compilerOptions": {
        "target": "ES2022",
        "module": "Node16",
        "moduleResolution": "Node16",
        "outDir": "./build",
        "rootDir": "./src",
        "strict": true,
        "esModuleInterop": true,
        "skipLibCheck": true,
        "forceConsistentCasingInFileNames": true
    },
    "include": ["src/**/*"],
    "exclude": ["node_modules"]
}
构建服务
在
src/index.ts文件的顶部添加以下内容:
ounter(lineounter(lineounter(lineounter(lineounter(lineounter(lineounter(lineounter(lineounter(lineounter(lineounter(lineounter(lineounter(lineounter(lineounter(lineounter(lineounter(lineounter(lineounter(lineounter(lineounter(lineounter(lineounter(lineounter(lineounter(lineounter(lineounter(line
import { McpServer } from "@modelcontextprotocol/sdk/server/mcp.js";
import { StdioServerTransport } from "@modelcontextprotocol/sdk/server/stdio.js";
import { z } from "zod";

// Configuration for APISIX MCP server
const APISIX_API_BASE = "http://127.0.0.1:9180/apisix/admin";
const APISIX_API_KEY = "edd1c9f034335f136f87ad84b625c8f1";// Create server instance
const server = new McpServer({
    name: "apisix-mcp",
    version: "1.0.0",
    config: {
        apiKey: {
            type: "string",
            description: "API key for APISIX Admin API authentication",
            default: APISIX_API_KEY
        },
        apiBase: {
            type: "string",
            description: "Base URL for APISIX Admin API",
            default: APISIX_API_BASE
        }
    }
});
这段代码用于创建一个 APISIX MCP 服务实例:「导入依赖」:
McpServer和
StdioServerTransport是用于创建 MCP 服务的工具。
z是 Zod 库,用于数据验证。「配置 APISIX MCP 服务」:
APISIX_API_BASE是 APISIX Admin API 的基础 URL。
APISIX_API_KEY是用于身份验证的 API 密钥。「创建服务实例」:使用
McpServer创建一个名为
apisix-mcp的服务实例,版本为
1.0.0。配置了
apiKey和
apiBase两个参数,分别用于指定 API 密钥和基础 URL,并提供了默认值。这段代码用于初始化一个 MCP 服务,为后续与 APISIX Admin API 的交互做准备,大家可以根据自己的业务进行简单的调整。
创建请求文件
然后我们添加一个单独的文件用于发送请求,官方的文档中使用的是
fetch,但我觉得用
axios在执行不同的请求方法时会更加方便一点,所以就改用
axios发送请求 :
ounter(lineounter(lineounter(lineounter(lineounter(lineounter(lineounter(lineounter(lineounter(lineounter(lineounter(lineounter(lineounter(lineounter(lineounter(lineounter(lineounter(lineounter(lineounter(lineounter(lineounter(lineounter(lineounter(lineounter(lineounter(lineounter(lineounter(lineounter(lineounter(lineounter(lineounter(lineounter(lineounter(lineounter(lineounter(lineounter(lineounter(lineounter(lineounter(lineounter(lineounter(lineounter(lineounter(lineounter(lineounter(lineounter(lineounter(lineounter(lineounter(lineounter(lineounter(lineounter(lineounter(lineounter(lineounter(lineounter(lineounter(lineounter(lineounter(line
/**
 * Define the common data structure returned by APISIX Admin API
 */
import axios from 'axios';

interface ApiResponse {
    value?: any;
    modifiedIndex?: number;
    createdIndex?: number;
    error?: string;
    message?: string;
}/**
 * 使用axios发送请求到APISIX管理API
 * @param url 请求的完整URL
 * @param method HTTP方法,默认为'GET'
 * @param data 请求数据,用于PUT/POST/PATCH请求
 * @param apiKey API密钥,用于认证,默认使用环境变量或硬编码值
 * @returns 返回API响应或null(如果发生错误)
 */
export async function makeAdminAPIRequest(
    url: string,
    method: string = 'GET',
    data?: any,    apiKey: string = process.env.APISIX_API_KEY || "edd1c9f034335f136f87ad84b625c8f1"): Promise {
    try {
        // 配置axios请求
        const response = await axios({
            method,
            url,
            data,
            headers: {
                'X-API-KEY': apiKey,
                'Content-Type': 'application/json'
            }
        });
        console.log(Axios请求成功: ${method} ${url});
        return response.data;
    } catch (error) {
        if (axios.isAxiosError(error)) {
            console.error(请求失败: ${method} ${url});
            console.error(状态码: ${error.response?.status}, 错误信息: ${error.message});
            console.error(响应数据:, error.response?.data);
        } else {
            console.error('发送API请求时出错:', error);
        }
        return null;
    }
}export default makeAdminAPIRequest;
实现执行工具
创建好了服务实例,并且实现了一个请求方法后,接下来到最核心的一步,也就是实现执行工具:
ounter(lineounter(lineounter(lineounter(lineounter(lineounter(lineounter(lineounter(lineounter(lineounter(lineounter(lineounter(lineounter(lineounter(lineounter(lineounter(lineounter(lineounter(lineounter(lineounter(lineounter(lineounter(lineounter(lineounter(lineounter(lineounter(lineounter(lineounter(lineounter(lineounter(lineounter(lineounter(lineounter(lineounter(lineounter(lineounter(lineounter(lineounter(lineounter(lineounter(lineounter(lineounter(lineounter(lineounter(lineounter(lineounter(lineounter(lineounter(lineounter(lineounter(lineounter(lineounter(lineounter(lineounter(lineounter(lineounter(lineounter(lineounter(lineounter(lineounter(lineounter(lineounter(lineounter(lineounter(lineounter(lineounter(lineounter(lineounter(lineounter(lineounter(lineounter(lineounter(lineounter(lineounter(line
const idSchema = z.object({
    id: z.string().describe("资源 id")
});

server.tool('get-routes',
    '列出所有路由',
    {},
    async (args, extra) => {
        const response = await makeAdminAPIRequest(${APISIX_API_BASE}/routes);
        return {
            content: [
                {
                    type: "text",
                    text: JSON.stringify(response, null, 2),
                },
            ],
        };
    }
);server.tool('create-route',
    '创建一个新的路由',
    routeSchema.shape,
    async (args, extra) => {
        try {            const routeId = args.id || Date.now().toString();            console.log(Starting route creation, ID: ${routeId}, path: ${args.route.uri});
            const response = await makeAdminAPIRequest(
                ${APISIX_API_BASE}/routes/${routeId},
                'PUT',
                args.route
            );
            if (!response) {
                console.error(Failed to create route, ID: ${routeId});
                return {
                    content: [
                        {
                            type: "text",
                            text: JSON.stringify({ error: "Failed to create route, please check the APISIX connection and logs" }, null, 2),
                        },
                    ],
                };
            }
            console.log(Route created successfully, ID: ${routeId});
            return {
                content: [
                    {
                        type: "text",
                        text: JSON.stringify(response, null, 2),
                    },
                ],
            };
        } catch (error: unknown) {
            console.error(Exception occurred:, error);
            const err = error instanceof Error ? error : new Error(String(error));
            return {
                content: [
                    {
                        type: "text",
                        text: JSON.stringify({ error: Failed to create route: ${err.message} }, null, 2),
                    },
                ],
            };
        }
    }
);
用
server.tool函数定义了两个个工具,分别用于获取路由数据和新增路由,我们在第二个参数中用中文描述了我们这个工具的作用,这个描述就是用来给大模型调用时进行语意分析后进行触发的,所以描述我们可以写的更加详尽一些,让没那么聪明的模型也号理解一点,这里只是一个简单示例,两个工具都通过
makeAdminAPIRequest函数与 APISIX Admin API 交互。
接下来我们执行
npm build将项目构建一下,可以看到
build目录也就是构建成功了

调试
在我们的 MCP 服务基础框架完成后,就到了调试环节。 MCP 服务的接入需要用到一些 AI 客户端,例如 cursor,vscode 中的 cline 插件,或者是 Claude 的官方应用,考虑到我们开发用的就是 curosr,所以这里我们直接使用 cursor 作为客户端进行调试。
第一步我们需要在
.cursor目录中创建
mcp.json文件用于声明 MCP 服务,在我的 windows 电脑上路径如下图:

创建完成后,我们在文件中写入配置:
ounter(lineounter(lineounter(lineounter(lineounter(lineounter(lineounter(lineounter(lineounter(lineounter(lineounter(lineounter(line
{
    "mcpServers": {
        "apisix-mcp": {
            "command": "node",
            "args": [
                "E:projectsapisix-mcpbuildindex.js"
            ]
        }
    }
}mcpServers字段代表我们声明的 MCP 服务,值的类型是对象,其中键名为服务名称,这里我们叫
apisix-mcp,可以根据自己的业务修改,
apisix-mcp的值也是一个对象,其中包含了
command和
args两个字段。
command代表启动 MCP 服务要执行的命令,因为我们的服务是用 node.js 写的,那么这里我们的
command就是
nodeargs是要传入的参数,也就是拼接在
command后面的内容,这里我们写的是上一步构建出来的产物的路径
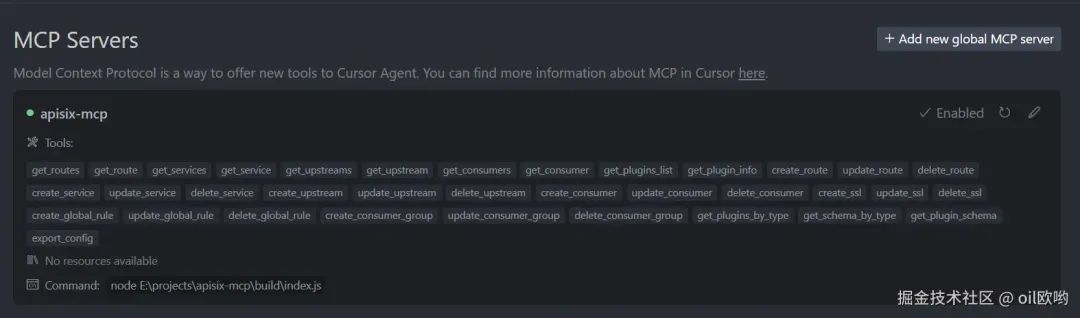
当配置完成后,我们打开 cursor 设置中 MCP 菜单项,如果没有看到这个菜单需要升级一下 cursor 的版本,然后我们会看到一个 apisix-mcp 的服务,而且还亮着绿灯,说明已经连接成功了,如果没有连接成功我们可以点一下刷新按钮。MCP 服务中还会展示我们的代码里定义了哪些工具和资源,(这里截图中的工具比较多是因为我后续实现了比较多个工具了,正常应该只展示我们实现的那两个工具):
要注意的是 cursor 在执行脚本时会弹出一个黑色的终端,代表我们 MCP 服务的进程是执行在这个终端的,在后台挂着就好了,不要关掉它。
接下来,我们在 cursor 的输入框中,选择
agent模式,然后选择一个比较聪明的模型,例如
claude 3.5/3.7或者
gpt4oo3-mini,不要选择
cursor-small或
gpt-4o-mini这种,因为我自己实测这两个模型似乎不具备
agent能力,可能是上下文太小了,所以不会调用 MCP 服务。这里我们选择
claude-3.7-sonnet,然后输入如下图的操作:

然后我们会看到 cursor 执行了
called MCP tool的操作,一共执行了四次,对应调用的
tool我们都能直接看到:

虽然大模型说创建成功了,但是我们还是自己检查一下,看看是不是真的成功了,这里我在终端输入:
ounter(lineounter(lineounter(line
curl http://127.0.0.1:9180/apisix/admin/routes -H "X-API-KEY: $admin_key" | jq
可以看到控制台打印出了我们创建的路由,并且插件也按照我们的要求配置了,说明真的创建成功了。
ounter(lineounter(lineounter(lineounter(lineounter(lineounter(lineounter(lineounter(lineounter(lineounter(lineounter(lineounter(lineounter(lineounter(lineounter(lineounter(lineounter(lineounter(lineounter(lineounter(lineounter(lineounter(lineounter(lineounter(lineounter(lineounter(lineounter(lineounter(lineounter(lineounter(lineounter(lineounter(lineounter(lineounter(lineounter(lineounter(lineounter(lineounter(lineounter(lineounter(lineounter(lineounter(lineounter(lineounter(lineounter(lineounter(lineounter(lineounter(lineounter(lineounter(lineounter(lineounter(lineounter(line
{
    "key": "/apisix/routes/1742721614502",
    "modifiedIndex": 98,
    "createdIndex": 98,
    "value": {
        "id": "1742721614502",
        "uri": "/api/httpbin/*",
        "upstream": {
            "pass_host": "pass",
            "nodes": {
                "httpbin.org:80": 1
            },
            "type": "roundrobin",
            "scheme": "http",
            "hash_on": "vars"
        },
        "status": 1,
        "create_time": 1742721614,
        "update_time": 1742721614,
        "priority": 0,
        "plugins": {
            "limit-req": {
                "key_type": "var",
                "allow_degradation": false,
                "rate": 2,
                "nodelay": false,
                "key": "remote_addr",
                "burst": 4,
                "rejected_code": 429,
                "policy": "local"
            },
            "cors": {
                "allow_headers": "*",
                "allow_origins": "*",
                "max_age": 3600,
                "expose_headers": "Content-Length,Content-Type",
                "allow_methods": "GET,POST,PUT,DELETE,PATCH,OPTIONS",
                "allow_credential": false
            },
            "limit-count": {
                "show_limit_quota_header": true,
                "count": 5,
                "key_type": "var",
                "time_window": 60,
                "key": "remote_addr",
                "allow_degradation": false,
                "rejected_code": 429,
                "policy": "local"
            }
        }
    }
}
至此为止,我们花了不用两个小时就能把一个现有服务接入大模型,通过自然语言进行交互。
后续我们要做的就是将所有的 API 转换为 MCP 中的工具,让大模型按需调用即可,这一步也很简单,直接把我们的 OpenAPI 文档提供给 cursor 就能批量生成了,我用一轮对话就全部生成好了,也就是上面截图中展示的所有 MCP 工具:

而且这里我非常推荐大家直接是用 curosr 去调试 MCP 服务,因为在我们实现 MCP 服务的项目中,如果发现 MCP 服务没法正常调用,我们可以直接让 cursor 自己调试,下面贴一个我调试过程中 cursor 自己的执行记录:

cursor 会一边调用 MCP 服务,根据服务的响应结果去调整我们的源码,然后自己重新构建新的产物再重新尝试调用 MCP 服务,直到服务正常工作,从开发到测试的流程自己闭环,真的很强!
总结
MCP 中的概念不仅仅有
tool这一种,但是目前我实现的功能只用到了这个工具,后续我将继续完善这个 MCP 服务的项目,等其他功能都摸清楚了再给大家完整的介绍 MCP 中的各种功能的实现。
我花了几个小时就把这个服务构建出来,而且最终的效果让我感觉蛮惊讶的,用自然语言去和系统交互的感觉很奇妙,如果再开发一个 MCP 的客户端,那都不需要写一个功能健全的控制台了,可玩性很强,上手又很简单,非常推荐大家去尝试写一下。
目前唯一的问题就是依赖能力比较强的模型,因此调用成本会比较高,但是未来随着大模型的能力越来越强,调用成本越来越低,后续 MCP 服务可能替代现有传统前端控制台成为主流。
如果文章对你有帮助,欢迎点个赞,respect~点击关注公众号,“技术干货” 及时达!