使用 Angular 和 Asp.Net WebAPI 将 Crystal Report 转换为 PDF
一、前言:
这篇文章讲述了如何在Angular中展示PDF格式的报告收据。解决方案包括利用ASP.NET Web API来生成Crystal Report的PDF版本,并将PDF文件以流的形式传输到Angular前端,以便在浏览器中直接查看。angular pdf 查看器具备多种高级功能,如分页、缩放、打印以及保存到本地等。如图1所示,您可以看到查看PDF报告的示例界面。angular pdf 查看器是一个强大的工具,它允许用户在前端轻松地查看和操作PDF文件。
在实现过程中,我们首先需要确保后端服务能够生成PDF文件。这可以通过Crystal Report来完成,它是一个强大的报表生成工具,可以与ASP.NET Web API集成,生成PDF格式的报告。一旦PDF文件生成,我们就可以通过Web API将其作为流传输到前端。
在Angular前端,我们需要使用一个能够处理PDF文件的查看器。有许多第三方库可以完成这项工作,但为了本故事的目的,我们将使用一个特定的angular pdf 查看器。angular pdf 查看器不仅能够展示PDF文件,还提供了用户友好的界面,使得用户可以轻松地进行分页、缩放、打印以及保存到本地等操作。
如图1所示,您可以看到使用angular pdf 查看器查看PDF报告的示例界面。这个界面非常直观,用户可以轻松地浏览PDF文件,并且利用angular pdf 查看器提供的功能进行各种操作。
文章中包含了完整的源代码,展示了如何从后端生成PDF文件,并通过Angular前端的PDF查看器展示给用户。通过这种方式,我们能够为用户提供一个流畅且功能丰富的PDF查看体验。
总的来说,angular pdf 查看器在处理PDF文件方面提供了一个非常有效的解决方案。它不仅能够展示PDF文件,还能够提供多种高级功能,如分页、缩放、打印以及保存到本地等,极大地增强了用户体验。通过结合ASP.NET Web API和Crystal Report,我们可以轻松地生成并展示PDF格式的报告收据。

图 1 — Crystal Report 以 PDF 格式呈现,用于在 Angular 中显示
二、应用程序架构概述
设想您和团队正在致力于将几个老旧的ASP.NET Framework Web应用程序进行现代化升级。目标技术栈是构建单页面应用(SPA),前端使用Angular,后端则由ASP.NET Web API提供支持。这些旧应用程序包含了数百份Crystal报表。您的任务是将这些报表迁移到新的平台上。然而,您发现Crystal Report无法在ASP.NET CORE的新环境中运行,这确实是一个意外
如图2所示,该架构描述了Angular应用通过REST API访问Crystal Report的方式。Crystal Report以PDF格式呈现,并通过流式传输的方式发送到Angular,以便在Web浏览器中展示。在Angular前端,我们将使用angular pdf 查看器来渲染这些PDF文件。angular pdf 查看器是一个强大的工具,它能够无缝地集成到我们的SPA中,并且提供丰富的功能,如分页、缩放、打印以及保存到本地等。
通过这种方式,用户可以在Angular应用中直接查看和操作PDF格式的Crystal Report报表,而无需进行任何额外的下载或安装。angular pdf 查看器的集成确保了报表的可访问性和易用性,同时保持了现代化的用户界面。
在实现过程中,后端的ASP.NET Framework 4.7 WebAPI 2将负责生成Crystal Report的PDF版本,并通过REST API将这些PDF文件以流的形式传输到前端。前端的Angular应用将使用angular pdf 查看器来接收这些流,并在用户的浏览器中展示PDF内容。
总的来说,通过结合ASP.NET Framework 4.7 WebAPI 2和angular pdf 查看器,我们能够以一种经济高效的方式将老旧的Crystal Report报表迁移到新的技术栈上。这种方法不仅避免了昂贵的重写成本,还确保了报表的现代化展示和用户友好的交互体验。

图 2—Angular 应用程序和 Web API 的架构
1、Github 存储库
本教程的完整源代码可在 GitHub 上找到。前端和后端代码组织在单独的项目中。这使得维护和部署到微服务架构中更加容易。
- workcontrolgit/CrystalReportWebAPI是用 ASP.NET Framework 4.7/Web API 2 编写的后端 REST API。它以 PDF 格式呈现 Crystal Report,并可通过 REST API HTTP Get 方法访问。自定义操作过滤器用于缓存报告以提高性能。
- workcontrolgit/AngularCrytalReportUI是前端 Angular v12 应用。它有一个仪表板,链接到由 Crystal Report 生成的四份 PDF 格式的财务报告。
2、前提条件
建议使用以下工具/技能。
- Visual Code ——Angular 的免费代码编辑器
- Visual Studio 2019 Community — C# 的免费代码编辑器
三、教程内容
本教程重点介绍以下编程技术
- 在后端 REST API 中将水晶报表渲染为 PDF 格式
- 将 PDF 数据文件传输到 Angular 前端以在浏览器中显示
本教程内容由以下几个部分组成:
第 1 部分: Git-Clone 后端 Crystal Report REST API 和代码演练将 Asp.Net WebAPI 项目克隆到本地并检查与将 Crystal Report 导出为 PDF 进行流式传输相关的代码。
第 2 部分: Git-Clone 前端 Angular 应用程序和代码演练 克隆 Angular 应用程序并演练 PDF 查看库 ngx-extended-pdf-viewer 的使用代码。
第 3 部分: 测试驱动应用程序 在本地主机上运行 Angular 和 Web API 并试用 Crystal Report。
第 1 部分: Git-Clone 后端 Crystal Report REST API 和代码演练
任务 1.1 – Git-Clone 后端 Crystal Report REST API
使用 Visual Studio 2019,我们将从 Github 克隆 Web API 源代码项目。按照以下步骤下载源代码(参见图 3 的视觉辅助):
- 启动 Visual Studio 2019 并选择选项“克隆存储库”
- 将 repo https://github.com/workcontrolgit/CrystalReportWebAPI克隆到 C:\apps\devkit\ApiResources\CrystalReportWebAPI
图 3—从 Github 克隆 Web API 源代码
在解决方案资源管理器中,您应该看到 CrystalReportWebAPI 项目。单击 CrystalReportWebAPI 项目并注意 SSL URL。该 URL 应设置为 https://localhost:44369。这是 Angular 应用将调用以获取报告的 REST API 服务器的地址。请参阅图 4 以获取解决方案资源管理器中项目的屏幕截图。
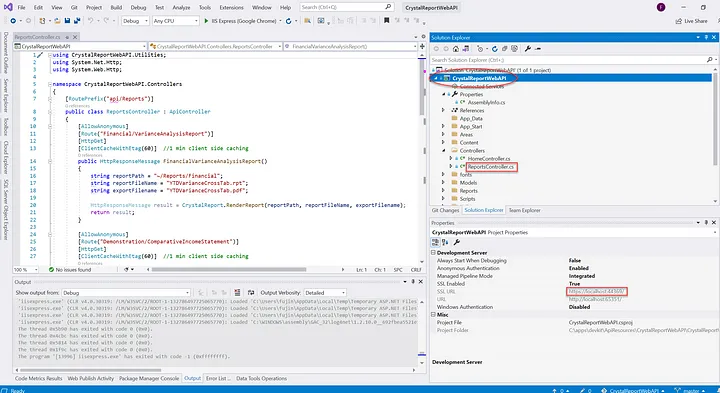
图 4—Visual Studio 解决方案资源管理器中的 CrystalReportWebAPI 项目
任务 1.2 — Crystal Report REST API 的代码演练
在本节中,我们将查看三个文件中的源代码,这些文件负责将 Crystal Report 渲染为 PDF 以供流式传输。这些文件超链接到存储库,以便您知道项目中的文件位置。
- ReportsController.cs— 通过 HTTP Get 公开 Crystal Report 的 Web API 控制器。请参阅图 5 中的源代码列表。
- CrystalReport.cs— 将 Crystal Report 导出为 PDF 并将响应标头设置为 application/pdf 的源代码。请参阅图 6 中的源代码列表。
- ClientCacheWithEtagAttribute.cs— 使用操作属性缓存 Crystal Report 的源代码。请参阅图 7 中的源代码列表。
using CrystalReportWebAPI.Utilities;

using System.Net.Http;

using System.Web.Http;


namespace CrystalReportWebAPI.Controllers

{

    [RoutePrefix("api/Reports")]

    public class ReportsController : ApiController

    {

        [AllowAnonymous]

        [Route("Financial/VarianceAnalysisReport")]

        [HttpGet]

        [ClientCacheWithEtag(60)]  //1 min client side caching

        public HttpResponseMessage FinancialVarianceAnalysisReport()

        {

            string reportPath = "~/Reports/Financial";

            string reportFileName = "YTDVarianceCrossTab.rpt";

            string exportFilename = "YTDVarianceCrossTab.pdf";


            HttpResponseMessage result = CrystalReport.RenderReport(reportPath, reportFileName, exportFilename);

            return result;

        }


        [AllowAnonymous]

        [Route("Demonstration/ComparativeIncomeStatement")]

        [HttpGet]

        [ClientCacheWithEtag(60)]  //1 min client side caching

        public HttpResponseMessage DemonstrationComparativeIncomeStatement()

        {

            string reportPath = "~/Reports/Demonstration";

            string reportFileName = "ComparativeIncomeStatement.rpt";

            string exportFilename = "ComparativeIncomeStatement.pdf";


            HttpResponseMessage result = CrystalReport.RenderReport(reportPath, reportFileName, exportFilename);

            return result;

        }


        [AllowAnonymous]

        [Route("VersatileandPrecise/Invoice")]

        [HttpGet]

        [ClientCacheWithEtag(60)]  //1 min client side caching

        public HttpResponseMessage VersatileandPreciseInvoice()

        {

            string reportPath = "~/Reports/VersatileandPrecise";

            string reportFileName = "Invoice.rpt";

            string exportFilename = "Invoice.pdf";


            HttpResponseMessage result = CrystalReport.RenderReport(reportPath, reportFileName, exportFilename);

            return result;

        }


        [AllowAnonymous]

        [Route("VersatileandPrecise/FortifyFinancialAllinOneRetirementSavings")]

        [HttpGet]

        [ClientCacheWithEtag(60)]  //1 min client side caching

        public HttpResponseMessage VersatileandPreciseFortifyFinancialAllinOneRetirementSavings()

        {

            string reportPath = "~/Reports/VersatileandPrecise";

            string reportFileName = "FortifyFinancialAllinOneRetirementSavings.rpt";

            string exportFilename = "FortifyFinancialAllinOneRetirementSavings.pdf";


            HttpResponseMessage result = CrystalReport.RenderReport(reportPath, reportFileName, exportFilename);


            return result;

        }

    }

}
图 5 — ReportController.cs 源代码列表
using CrystalDecisions.CrystalReports.Engine;

using CrystalDecisions.Shared;

using System.IO;

using System.Net;

using System.Net.Http;


namespace CrystalReportWebAPI.Utilities

{

    public static class CrystalReport

    {

        public static HttpResponseMessage RenderReport(string reportPath, string reportFileName, string exportFilename)

        {

            var rd = new ReportDocument();


            rd.Load(Path.Combine(System.Web.Hosting.HostingEnvironment.MapPath(reportPath), reportFileName));

            MemoryStream ms = new MemoryStream();

            using (var stream = rd.ExportToStream(ExportFormatType.PortableDocFormat))

            {

                stream.CopyTo(ms);

            }


            var result = new HttpResponseMessage(HttpStatusCode.OK)

            {

                Content = new ByteArrayContent(ms.ToArray())

            };

            result.Content.Headers.ContentDisposition =

                new System.Net.Http.Headers.ContentDispositionHeaderValue("attachment")

                {

                    FileName = exportFilename

                };

            result.Content.Headers.ContentType =

                new System.Net.Http.Headers.MediaTypeHeaderValue("application/pdf");

            return result;

        }

    }

}
图 6 — CrystalReport.cs 源代码清单
using System;

using System.Linq;

using System.Net;

using System.Net.Http;

using System.Net.Http.Headers;

using System.Security.Cryptography;

using System.Text;

using System.Threading;

using System.Threading.Tasks;

using System.Web.Http.Filters;


namespace CrystalReportWebAPI.Utilities

{

    /// <summary>

    /// Enables HTTP Response CacheControl management with ETag values.

    /// How to use ETag in Web API using action filter along with HttpResponseMessage

    /// https://stackoverflow.com/questions/20145140/how-to-use-etag-in-web-api-using-action-filter-along-with-httpresponsemessage/49169225#49169225

    /// </summary>

    public class ClientCacheWithEtagAttribute : ActionFilterAttribute

    {

        private readonly TimeSpan _clientCache;


        private readonly HttpMethod[] _supportedRequestMethods = {

        HttpMethod.Get,

        HttpMethod.Head

    };


        /// <summary>

        /// Default constructor

        /// </summary>

        /// <param name="clientCacheInSeconds">Indicates for how long the client should cache the response. The value is in seconds</param>

        public ClientCacheWithEtagAttribute(int clientCacheInSeconds)

        {

            _clientCache = TimeSpan.FromSeconds(clientCacheInSeconds);

        }


        public override async Task OnActionExecutedAsync(HttpActionExecutedContext actionExecutedContext, CancellationToken cancellationToken)

        {

            if (!_supportedRequestMethods.Contains(actionExecutedContext.Request.Method))

            {

                return;

            }

            if (actionExecutedContext.Response?.Content == null)

            {

                return;

            }


            var body = await actionExecutedContext.Response.Content.ReadAsStringAsync();

            if (body == null)

            {

                return;

            }


            var computedEntityTag = GetETag(Encoding.UTF8.GetBytes(body));


            if (actionExecutedContext.Request.Headers.IfNoneMatch.Any()

                && actionExecutedContext.Request.Headers.IfNoneMatch.First().Tag.Trim('"').Equals(computedEntityTag, StringComparison.InvariantCultureIgnoreCase))

            {

                actionExecutedContext.Response.StatusCode = HttpStatusCode.NotModified;

                actionExecutedContext.Response.Content = null;

            }


            var cacheControlHeader = new CacheControlHeaderValue

            {

                Private = true,

                MaxAge = _clientCache

            };


            actionExecutedContext.Response.Headers.ETag = new EntityTagHeaderValue($"\"{computedEntityTag}\"", false);

            actionExecutedContext.Response.Headers.CacheControl = cacheControlHeader;

        }


        private static string GetETag(byte[] contentBytes)

        {

            using (var md5 = MD5.Create())

            {

                var hash = md5.ComputeHash(contentBytes);

                string hex = BitConverter.ToString(hash);

                return hex.Replace("-", "");

            }

        }

    }

}
图 7 — ClientCacheWithEtagAttribute.cs 源代码列表
第 2 部分: Git-Clone 前端 Angular 应用程序和代码演练
任务 2.1 — Git-Clone 前端 Angular 应用程序
在本部分教程中,我们将从 GitHub git-clone Angular 应用程序并运行 npm install 下载节点模块。在进行克隆之前,请确保在桌面上创建一个文件夹 C:\apps\devkit\Clients, 用于存储 Angular 源代码。
- 启动可视化代码
- 转到菜单“View”>“Command Pallet”(或 Ctrl-Shift-P)。请参阅图 7 以获得视觉辅助。
- 输入“Clone”并选择 Git: Clone。参见图 x 的视觉辅助
- 当提示 提供存储库 URL 或选择存储库源时,输入 https://github.com/workcontrolgit/AngularCrystalReportUI。 请参阅图 8 中的视觉辅助。
- 选择文件夹 C:\apps\devkit\Clients 保存源代码。
- 转到菜单“视图”>“终端”(或 Ctrl + ‘),然后在命令行中输入 npm i ,然后按 Enter。恢复 NPM 包可能需要几分钟,具体取决于您的网络带宽。请参阅图 9 了解视觉辅助。
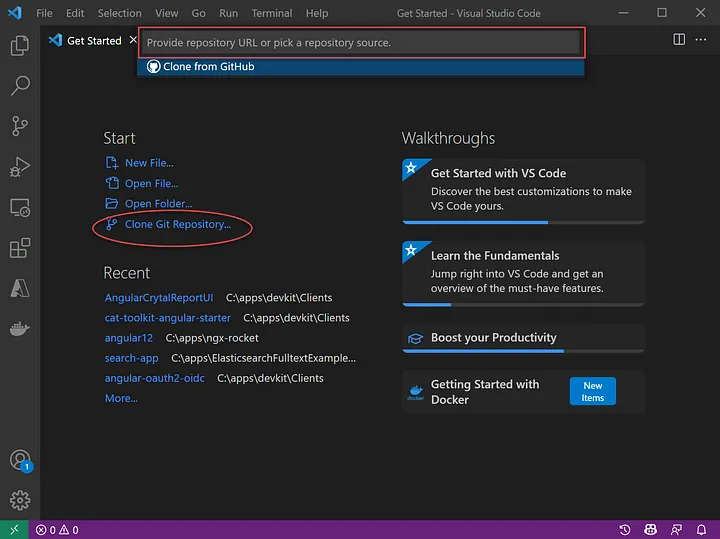
图 7 — 带有克隆 repo 选项的 Visual Code
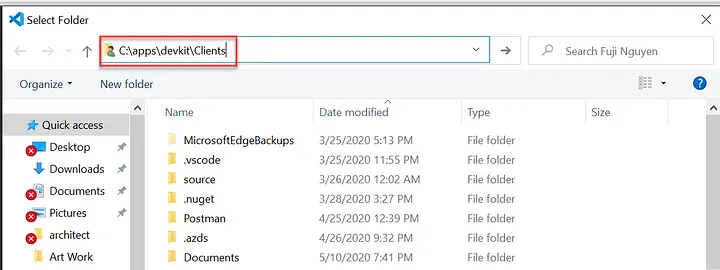
图 8 — Visual Code 提示保存源文件位置
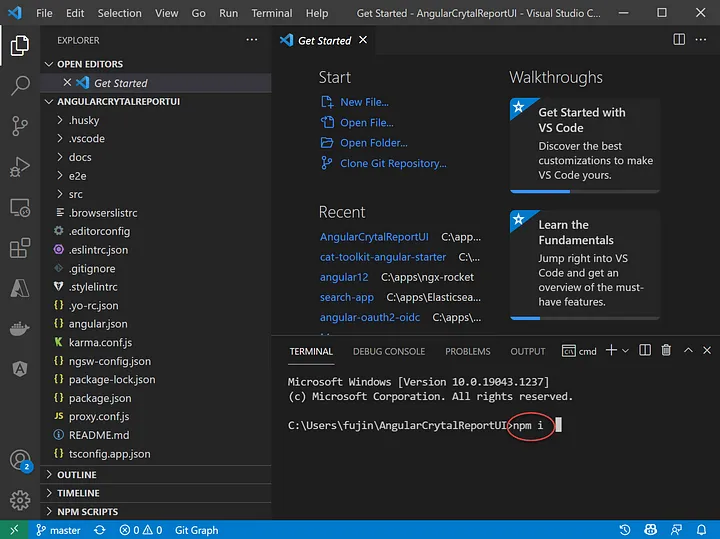
图 9 — 通过命令 npm i (安装)恢复 NPM 包
任务 2.2 — 前端 Angular 应用的代码演练
以下是支持在 angular pdf 查看器中以 PDF 形式呈现的 Crystal Report 显示的主要源代码文件
- environment.ts — 具有 webapi 服务器的设置。参见图 10。
- report.service.ts — 具有使用 Angular HTTP 客户端调用 Web API 的方法。参见图 11。
- saving.module.ts — 包含客户 PDF 查看器的设置。参见图 12。
- saving.component.html — 包含显示 pdf 的代码。参见图 13。
- saving.component.ts — 包含调用报告服务器 WebAPI 的代码。参见图 14。
// This file can be replaced during build by using the fileReplacements array.
// ng build --prod replaces environment.ts with environment.prod.ts.
// The list of file replacements can be found in angular.json.

// .env.ts is generated by the npm run env command
// npm run env exposes environment variables as JSON for any usage you might
// want, like displaying the version or getting extra config from your CI bot, etc.
// This is useful for granularity you might need beyond just the environment.
// Note that as usual, any environment variables you expose through it will end up in your
// bundle, and you should not use it for any sensitive information like passwords or keys.
import { env } from './.env';

export const environment = {
  production: false,
  version: env.npm_package_version + '-dev',
  serverUrl: '/api',
  defaultLanguage: 'en-US',
  supportedLanguages: ['en-US'],
  reportServer: 'https://localhost:44369'
};

/*
 * For easier debugging in development mode, you can import the following file
 * to ignore zone related error stack frames such as zone.run, zoneDelegate.invokeTask.
 *
 * This import should be commented out in production mode because it will have a negative impact
 * on performance if an error is thrown.
 */
// import 'zone.js/dist/zone-error';  // Included with Angular CLI.
图 10— Environment.ts 文件中的 reportServer URL 设置图
import { Injectable } from '@angular/core';

import { HttpClient } from '@angular/common/http';

import { Observable } from 'rxjs';

import { environment } from '@env/environment';


@Injectable({

  providedIn: 'root'

})

export class ReportService  {


  reportServer: string | null = environment.reportServer;

  srvURL: string = "";


  constructor(private httpClient: HttpClient) { }


  getInvoice(): Observable<any> {

    this.srvURL  = this.reportServer + '/api/Reports/VersatileandPrecise/Invoice';


    return this.httpClient.get(this.srvURL, {responseType: "blob"});

  }


  getSaving(): Observable<any> {

    this.srvURL  = this.reportServer + '/api/Reports/VersatileandPrecise/FortifyFinancialAllinOneRetirementSavings';


    return this.httpClient.get(this.srvURL, {responseType: "blob"});

  }


  getFinancial(): Observable<any> {

    this.srvURL  = this.reportServer + '/api/Reports/Financial/VarianceAnalysisReport';


    return this.httpClient.get(this.srvURL, {responseType: "blob"});

  }

  getIncome(): Observable<any> {

    this.srvURL  = this.reportServer + '/api/Reports/Demonstration/ComparativeIncomeStatement';


    return this.httpClient.get(this.srvURL, {responseType: "blob"});

  }


}
11 — report.service.ts 文件中的源代码列表
import { NgModule } from '@angular/core';

import { CommonModule } from '@angular/common';

import { TranslateModule } from '@ngx-translate/core';


import { SavingRoutingModule } from './saving-routing.module';

import { SavingComponent } from './saving.component';

import { NgxExtendedPdfViewerModule } from 'ngx-extended-pdf-viewer';


@NgModule({

  imports: [CommonModule, TranslateModule, SavingRoutingModule, NgxExtendedPdfViewerModule],

  declarations: [SavingComponent],

})

export class SavingModule {}
图 12 — saving.module.ts 文件中的源代码列表
<div class="container-fluid">

  <div class="jumbotron text-center">

    <h1>

      <span translate>Retirement Savings Report</span>

    </h1>

  </div>

  <div class="container">

    <ngx-extended-pdf-viewer [src]="pdfSource" [useBrowserLocale]="true"> </ngx-extended-pdf-viewer>

  </div>

</div>
图 13 — saving.component.html 文件中的源代码列表
import { Component, OnInit } from '@angular/core';

import {ReportService} from '@app/services/report.service';


@Component({

  selector: 'app-saving',

  templateUrl: './saving.component.html',

  styleUrls: ['./saving.component.scss'],

})

export class SavingComponent implements OnInit {


  pdfSource: any;

  constructor(private reportService: ReportService) {}


  ngOnInit() {

    this.reportService.getSaving()

    .subscribe(data => {this.pdfSource = data;

    });

  }

}
图 14 — saving.component.ts 文件中的源代码列表
第 3 部分: 测试应用程序
要运行应用程序,请首先启动 WebAPI 解决方案,然后启动 angular pdf 查看器。
3.1 运行WebAPI
在 Visual Studio 中,按 F5 运行解决方案。您应该看到项目正在运行,如图 15 所示。单击菜单 Swagger 以查看 Web API资源。
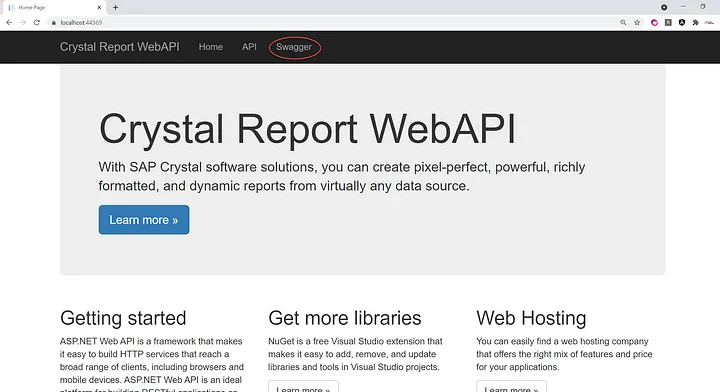
图 15 — WebAPI 项目正在运行
在 Swagger 屏幕中,单击资源报告以查看四个端点。请参阅图 16 以获得视觉辅助。
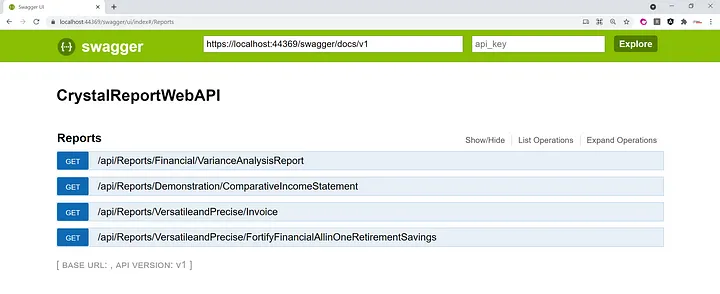
图 16 — WebAPI Swagger 显示资源报告和四 (4) 个端点
3.2 运行 Angular 应用
要运行angular pdf 查看器请从 Visual Code > Terminal 屏幕运行 ng serve -o 以在浏览器中自动打开 Angular 应用。您应该会看到主页,其中包含一个用于访问报告的仪表板,如图 17 所示 。
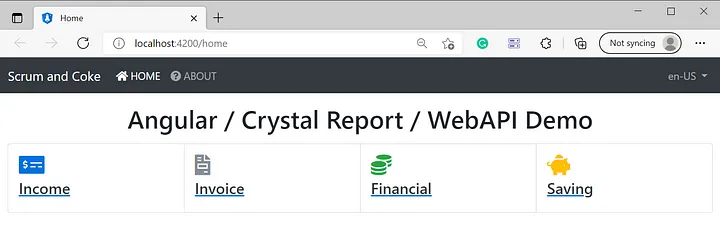
图 17 — Angular 应用仪表板
单击“保存”链接可以查看 PDF 报告,如图 18 所示。
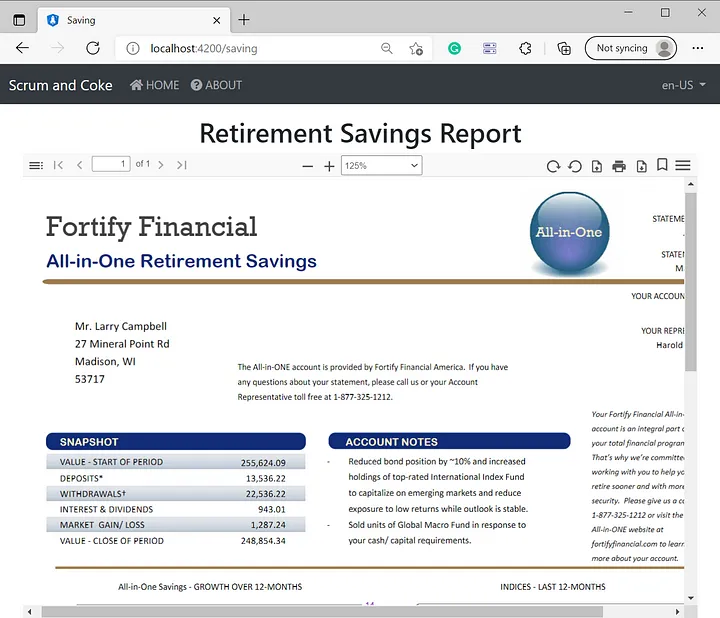
图 18— 渲染为 PDF 并在 Angular 中显示的示例 Crystal Report
最新文章
- 供应链管理中的 EDI 与 API 趋势解析
- 提升 API 和数据库性能的有效策略
- 通过API集成赋能Autogen Multi-Agent系统
- 身份证二要素API在Java、Python、PHP中的使用教程
- Python网页抓取API:获取Google搜索结果的实用指南
- API安全指南:如何保护数据免受攻击?
- 用花粉季节查询api提高生活质量:Ambee的季节性追踪功能
- 什么是API测试?API测试指南 – Parasoft
- 顶级API安全攻击:理解与缓解风险
- 使用免费API实时抓取百度热搜的实战教程
- 使用Hacking APIs GPT 进行 API 安全测试
- 企业三要素认证API在Java、Python、PHP中的使用教程